Flip over a modern race bib and you will usually find a thin foam-and-film rectangle glued to the back. That is the timing tag, and it is the reason a 3,000-person race can post accurate finish times within seconds of each runner crossing the line. For a race director choosing bibs, understanding what that tag is and how it gets read changes the questions you ask your printer and your timer. This is a plain-language walk through the technology and the numbers behind it.
What the tag on the back actually is
The overwhelming majority of race timing runs on passive UHF RFID operating in the 860 to 960 MHz band, following the ISO/IEC 18000-6C and EPC Gen2v2 standards. Passive means the tag carries no battery. It sits inert until it enters the radio field thrown out by a reader antenna, draws power from that field, and reflects back a modulated signal carrying its unique ID. That is why disposable tags can cost cents rather than dollars: there is nothing inside but an antenna and a tiny chip.
The physical tag is a printed inlay, typically something like an Impinj M830 or NXP UCODE 9 in a 97 by 27 millimeter label, with the antenna trace occupying most of that footprint. It is adhered to the bib during production, oriented to match the polarization of the timing antennas the race will use. One detail matters more than people expect: the human body absorbs UHF radio energy, so tags are often mounted with a small foam spacer that lifts the inlay a few millimeters off the runner’s shirt. That gap measurably improves read rate. This is also why the tag lives on the bib, worn on the front of the torso facing the antennas, rather than tucked into a pocket.
How your time gets recorded
At each timing point the runner passes through a reading field created by antennas. Two antenna styles do the work. Mat antennas lie flat on the ground and read tags from below as runners step over them, while panel antennas stand on both sides of the course at roughly bib height, angled inward. Large races combine the two so a tag gets multiple chances to be read from multiple angles in the fraction of a second a runner is in the zone. The reader logs the tag ID and a timestamp, and software matches that ID to the runner assigned to the bib.
Read rate is the number that keeps timers awake. A well-designed system is expected to catch essentially everyone: as a reference point, the New York City Marathon has reported a 99.9 percent read rate using roughly 70 controllers across 30 control lines. That reliability does not come from one antenna working harder; it comes from redundancy, both in antenna placement and, often, in the number of tags on each bib.
One tag or two?
Timers talk about single versus double bib tagging. In a single-tag setup each bib carries one inlay, which is the most cost-effective choice and is perfectly adequate for most local and mid-sized events. In a double-tag setup, two inlays encoded with the same ID are applied to each bib, separated by at least a few inches so they do not detune each other. Because either tag can trigger the read, the odds of missing a runner drop sharply, which is why championship and large-field races often specify it. The tradeoff is blunt: two tags cost roughly twice as much per bib as one.
That decision is really about per-runner economics, and the numbers are small but they scale. A disposable UHF inlay runs from a few cents to about one euro depending on volume and model, so a bundled chip-and-bib package typically lands around two to three per participant. Double-tagging pushes the tag portion up before you have printed a single number. Across a 5,000-runner event, choosing double tags is a four-figure line item, so it is worth deciding deliberately rather than by default.
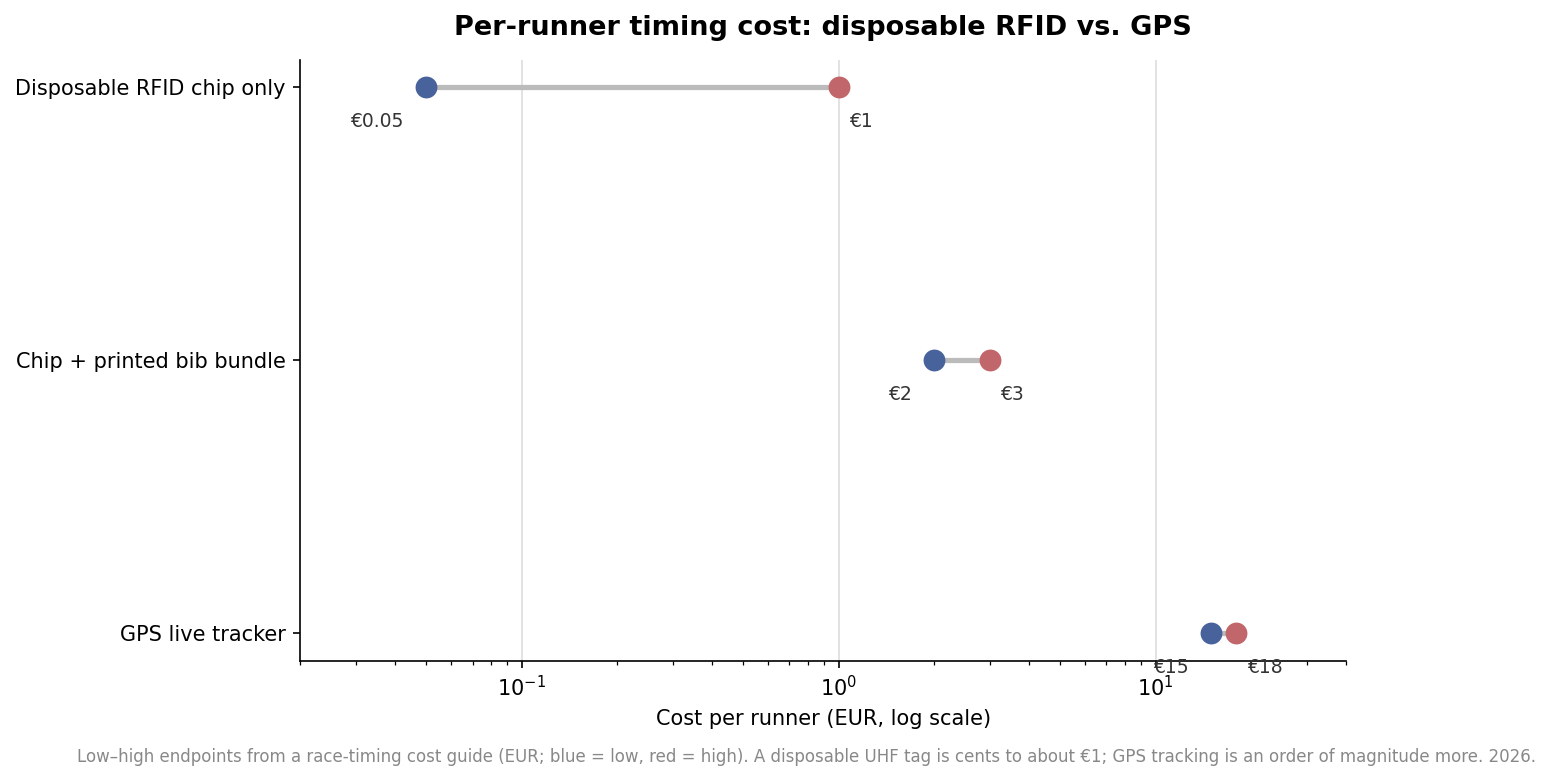
Read the chart as orders of magnitude rather than exact quotes. The takeaway for most organizers is that disposable RFID is the cheapest reliable way to time a field, an order of magnitude below live GPS tracking, which is why it dominates road racing. Reserve GPS for events where spectators need a moving map, not for standard finish-line timing.
What the full timing setup costs
The tag is the cheap part. The larger costs sit in the timing operation around it: the portals at the start, finish and any split points, the mats and structures, and the staff who run them on race day. A small local race can be timed for a few hundred, while a large event with multiple splits and backup systems runs into the thousands.
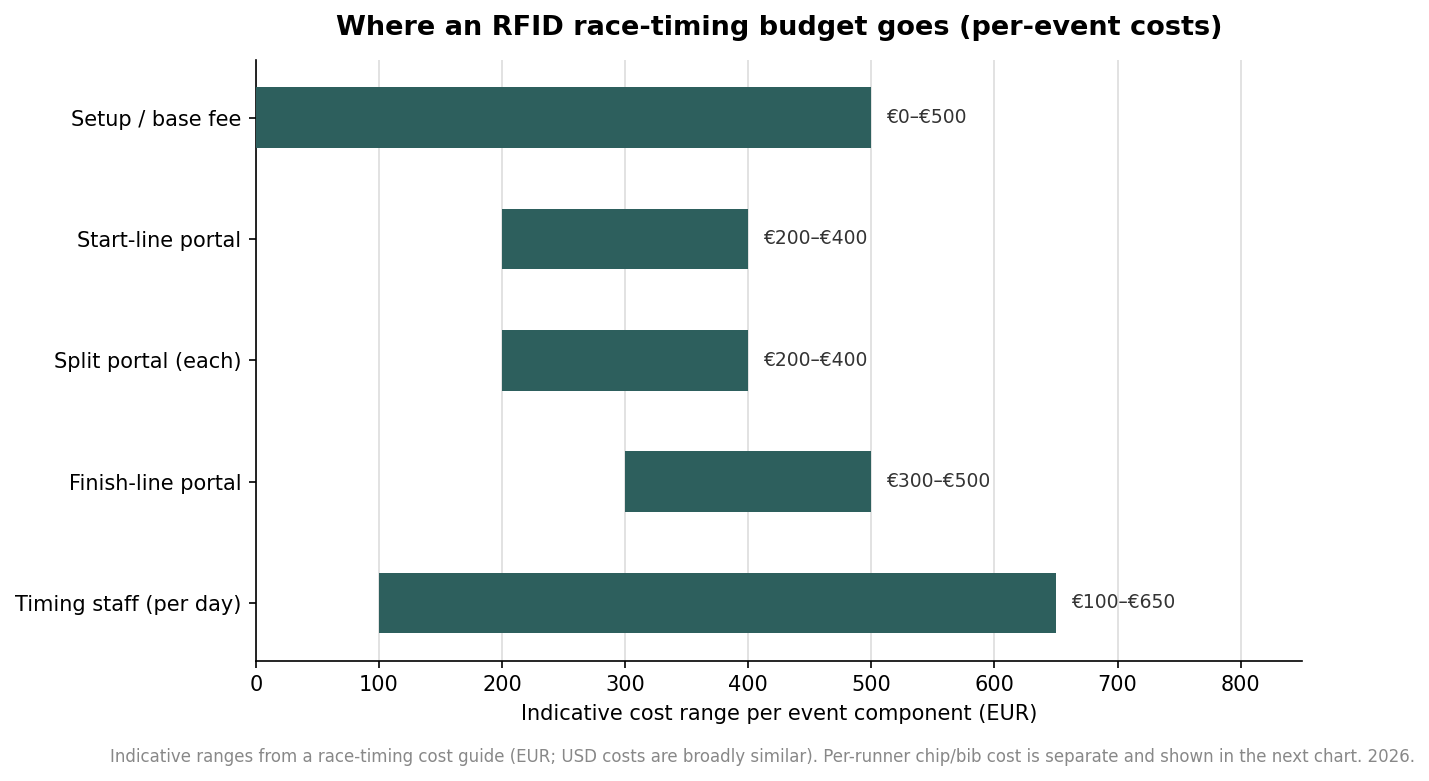
These are indicative euro ranges from a timing-cost guide, and dollar figures are broadly similar, but the structure is what to internalize. Fixed costs like portals and staff do not shrink with a small field, so per-runner cost is high for tiny races and falls as you spread those fixed costs across more entrants. If you are timing a 200-person fun run, the chips are almost free and the portals are almost everything; at 5,000 runners the balance flips. Knowing which side of that curve you are on tells you whether to negotiate the setup fee or the per-tag price.
What to hand your timer and your printer
Two suppliers touch the bib: whoever prints it and whoever times the race, and they need to agree before production. Ask your timer which tag model and orientation they want, whether they need single or double tagging, and whether they supply the inlays or expect the printer to apply them. Many bib printers can adhere disposable inlays during production, which saves the timer a night of hand-applying stickers, but only if the tag placement and spacing are specified up front. Confirm the tag sits in a consistent zone on every bib, clear of fold lines and pin holes, and leave the foam spacer in the plan if your timer recommends one. Get those details onto the order and the technology mostly disappears into the background, which is exactly where a race director wants it on event morning.
Leave a Reply