Category: Uncategorized

  • How Many Race Bibs to Order, and How to Number Them

    How Many Race Bibs to Order, and How to Number Them

    The most common race-bib ordering mistake is arithmetic, not design. A director takes the current registration count, orders exactly that many bibs, and then spends race morning improvising when forty walk-up runners appear and a stack of bibs turns out water-spotted from a leaky tent. Ordering the right quantity, and numbering it so the pile makes sense at 6 a.m., is a small planning exercise with a few reliable rules. Here is how to size and structure a bib order so the packet table runs itself.

    Start from your registration estimate

    Begin with a realistic projection of total registrations, not today’s count, because most events pick up a meaningful share of sign-ups in the final two weeks. Then resist the instinct to trim for no-shows. Roughly 5 to 10 percent of registered runners never start, but that fact does not shrink your order, because each of those runners already has a number assigned and a bib printed with it. No-shows are bibs you produce and never hand out; they are not bibs you skip. The registration estimate is your floor, and everything else in the order sits on top of it.

    Add a buffer for day-of and late registration

    The number that actually protects you is the walk-up buffer. Community 5Ks and charity runs can take a surprising share of their field on race morning, so a buffer in the range of 10 to 15 percent over projected registration is sensible for those events; large, mostly pre-registered races with hard caps can run leaner. These extra bibs should be generic — carrying the event branding and a number but no pre-printed name — so they can go to anyone who signs up at the table. If your bibs are personalized with runner names, order a separate block of blank-name bibs specifically for day-of entrants, because you cannot personalize on site.
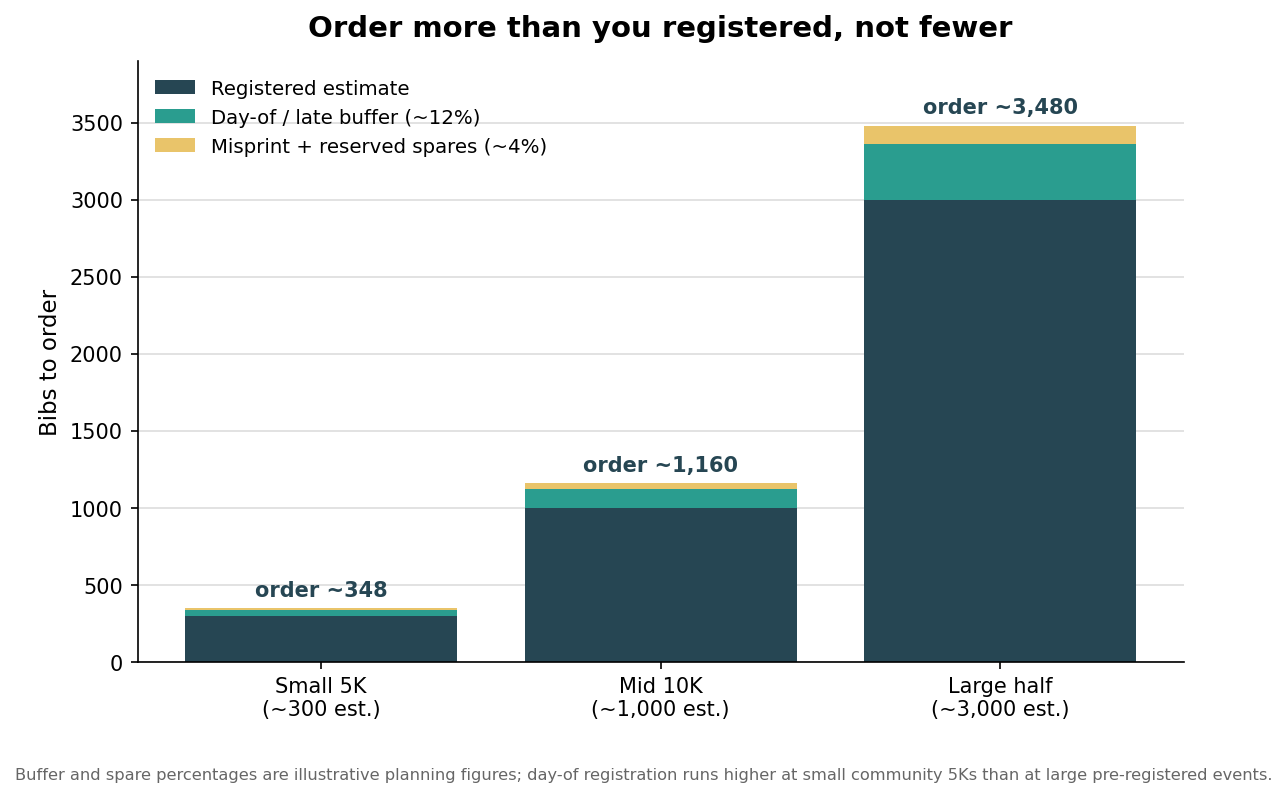
    Stacked bar chart of bib order composition for three event sizes, adding a day-of buffer and spares on top of the registration estimate
    A sound bib order stacks a walk-up buffer and spares on top of your registration estimate.

    Add spares for spoilage, VIPs, and media

    On top of the walk-up buffer, add a smaller pool of spares, commonly around 3 to 5 percent. These cover the bibs that get creased, water-damaged, or misprinted, the replacements for runners who tear or lose theirs, and the handful you will want to reserve for people who are not in the registration system at all: elite invitees, sponsors, staff, photographers, and press. Reserving a dedicated low-number block for these roles keeps them out of the general sequence and makes them easy to find in a hurry. It is cheaper to have thirty spare bibs you never open than to be one bib short when a sponsor’s chief executive shows up to run.

    Numbering that survives race morning

    How you number the bibs matters as much as how many you order. Start the sequence at a round number rather than 1 — beginning at 100, or 1001 for a larger field, keeps every bib the same digit width, which reads more cleanly at the finish line and in photos, and leaves a low block free for VIP and staff numbers. If your event uses waves or corrals, assign each start group its own number range so the bib itself tells a volunteer which wave a runner belongs to; a runner wearing 2140 is visibly in the 2000s corral. Leave gaps between blocks for late additions, and if the race is chip-timed, remember that each number is tied to a specific RFID tag, so a reprinted or reassigned bib has to be re-associated in the timing system rather than simply swapped. Finally, decide deliberately whether numbers carry across years; reusing a loyal runner’s number can be a nice touch, but only when you plan the sequence around it rather than discovering the collision on order day.
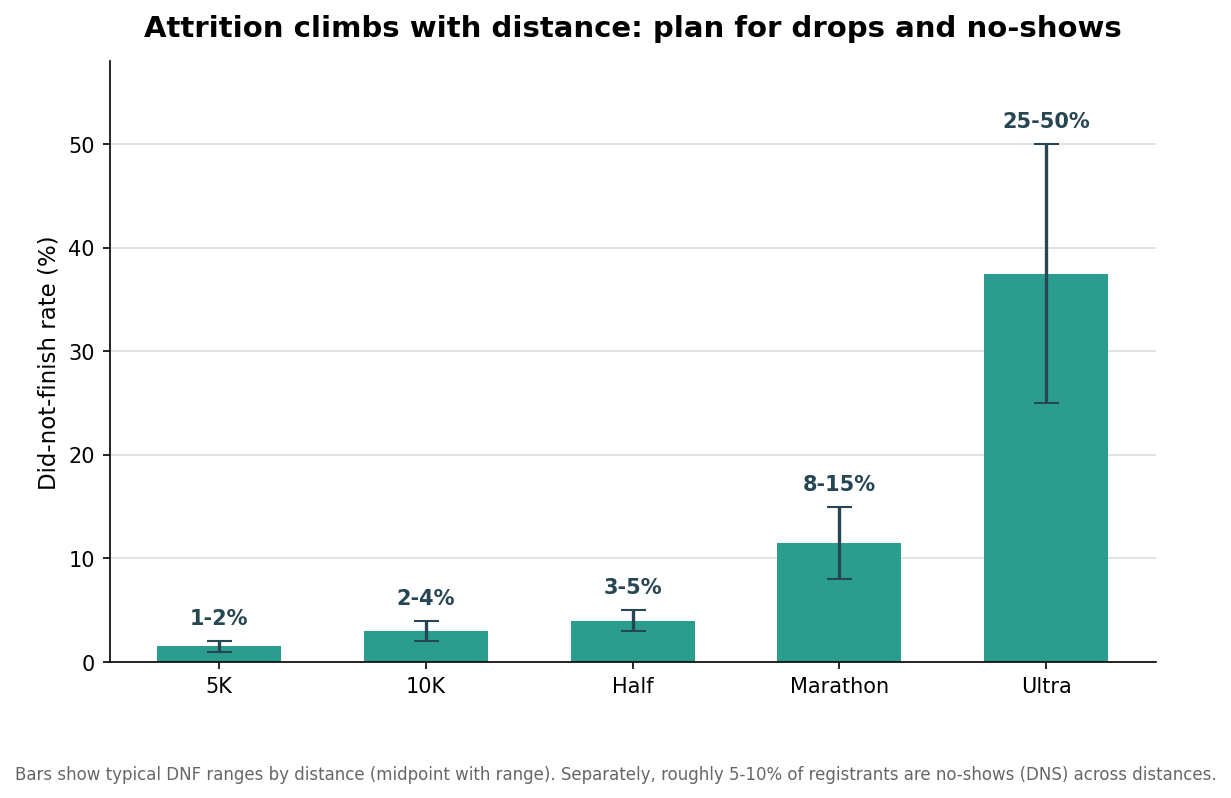
    Bar chart of typical did-not-finish rates by race distance with ranges, from 1-2 percent for 5Ks up to 25-50 percent for ultras
    Attrition rises with distance; separately, about 5-10 percent of registrants never start.

    Sort the order so pickup runs fast

    A well-sized, well-numbered order can still create a bottleneck if it arrives as one undifferentiated stack. Decide before the bibs ship how packet pickup will be organized, because that choice determines how you want the print run split and boxed. Most events pull bibs by number, so having them delivered in clean numeric blocks, banded or bagged in ranges such as 100 to 199 and 200 to 299, lets volunteers find a runner’s bib in seconds. If pickup is organized alphabetically by last name instead, you will need the registration export mapped to numbers so each packet can be pre-assembled, which is far easier to do in the days before the event than in a scramble at the table. Keep the reserved VIP, staff, and day-of blocks physically separate from the general sequence, clearly labeled, so nobody hands a sponsor bib to the wrong runner. The generic walk-up bibs belong in their own bin at the registration station, ready to issue without touching the pre-sorted packets. None of this changes what you order, but it changes how usable the order is at 6 a.m., and it is worth settling while you still have the print shop on the line.

    A note on size and lead time

    Standard race bibs land around 5.5 by 7.5 inches, large enough for a bold number and sponsor logos while still sitting comfortably on a torso; marquee events sometimes go larger for elite and marketing visibility. Whatever size and quantity you settle on, place the order early. Bibs need time for proofing and production, and that window tightens during peak race season when print shops are busiest, so locking your numbers and artwork well ahead of race week is the cheapest insurance in the whole plan. Build the count from registration up through buffer and spares, structure the numbering around your waves, and the bib pile becomes one less thing to manage on race morning.
  • Race Bib Attachment: What to Bundle in the Packet and When Pins Fall Short

    Race Bib Attachment: What to Bundle in the Packet and When Pins Fall Short

    Bib design gets all the attention, but on race morning the humble question of how the bib actually stays on the runner is what generates complaints, torn shirts, and mistimed finishes. If you organize events, the attachment method is a procurement decision you make on every runner’s behalf, and it interacts with the bib material, the timing system, and your budget. This guide lays out what to bundle in the packet, when the standard approach falls short, and how the alternatives really compare once you multiply them across a full field.

    The default that works: four pins, four corners

    The reason nearly every race hands out safety pins is that four pins in the four corners is a genuinely good solution. Four is the standard for a reason: pinning only the top two corners lets the bib flap, which is noisy, catches wind, and makes finish-line photos and manual number-reading harder. All four corners hold the bib flat against the torso where it should sit, across the abdomen rather than high on the chest. Pins are close to free, need no instructions, and work on any shirt. For the overwhelming majority of 5Ks, charity runs, and school events, a small envelope of four pins in the packet is the correct answer and the story ends there.

    What pins cost you beyond the pins

    The friction with pins is not the price, it is the side effects. They put four holes in a shirt, which runners resent on a favorite technical top, and they interact badly with two things you may have designed into the bib. If you use Tyvek versus standard paper bibs, a pin hole in paper can become a tear-out under wind load, so a lightweight paper bib pinned at only two points is asking to be lost on course; Tyvek’s tear resistance tolerates pins far better. The second issue is timing. If your bibs carry an RFID chip on the back, a pin driven through the chip or its antenna can kill the read, so your packet instructions and the bib art should steer pins to the corners and away from the printed chip zone. None of this argues against pins; it argues for four of them, placed correctly, on a bib material that can take them.

    The alternatives runners actually buy

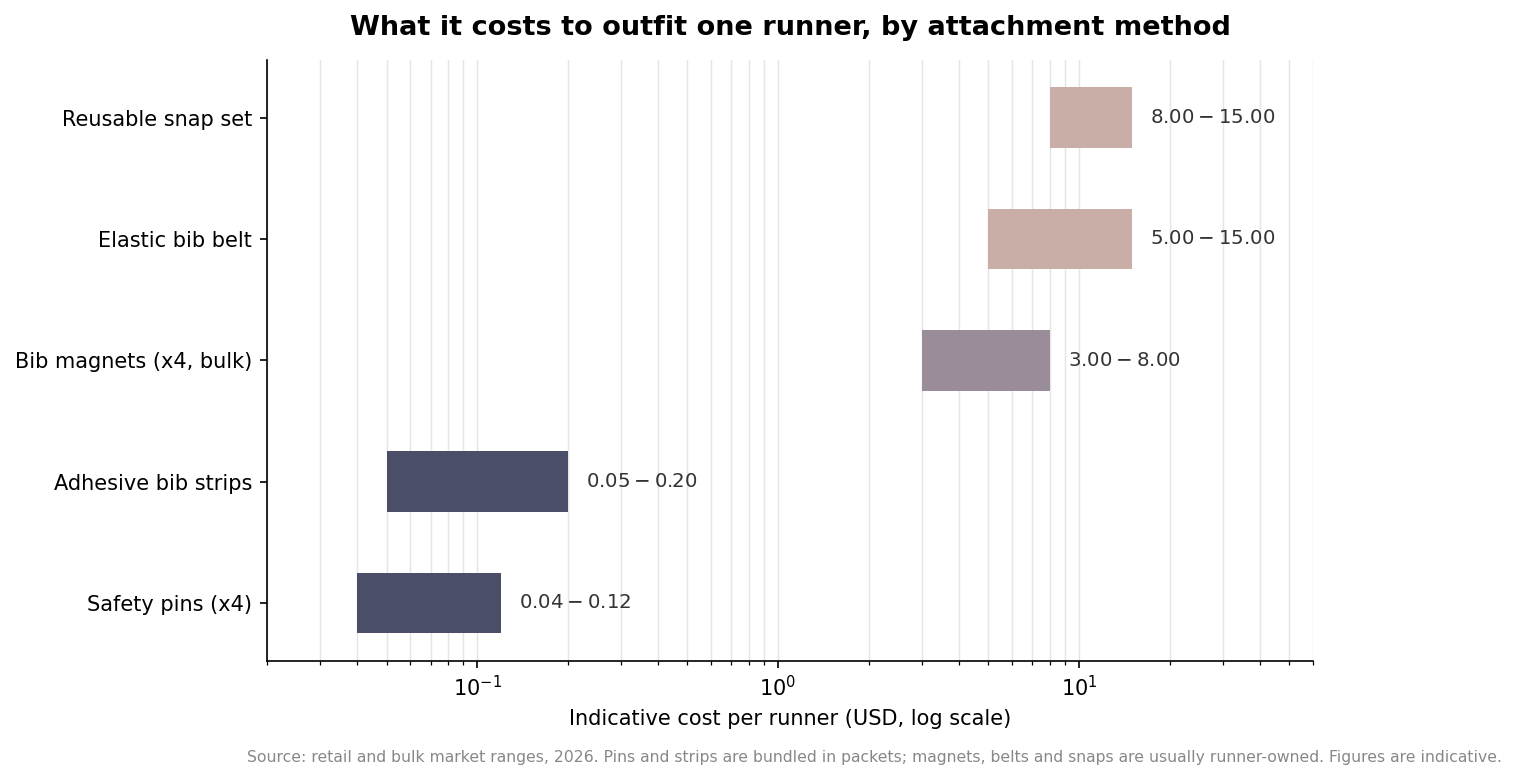
    Beyond pins sits a small market of reusable attachments that solve the shirt-hole problem, and it helps to know what they are even if you never stock them. Bib magnets use a set of four magnet pairs to hold the bib with no holes, though they can be dislodged by a hard bump and are a loss risk on an expensive item. Snap-style holders, two plastic or metal pieces that clamp through the shirt and bib, are reusable hundreds of times and can even be branded, but they cost real money per set. Elastic bib belts, popular in triathlon, clip the bib to a waist strap so it can rotate from back to front, and they never touch the shirt at all. The catch across all three is cost, and the gap versus pins is not small.

    Log-scale range bar chart of indicative per-runner cost for race bib attachment methods: safety pins, adhesive strips, magnets, belts, and snap sets
    Pins and adhesive strips cost cents per runner; reusable hardware costs dollars.

    Read that chart as two tiers. Pins and adhesive strips are packet-economical, in the range of a few cents per runner, which is why they are the only two methods most organizers ever bundle. Magnets, belts, and snap holders live one or two orders of magnitude higher because they are durable goods designed to be reused across many races. That reusability is genuine value, but it accrues to the individual runner who races often, not to an organizer outfitting a one-time field. The sensible division of labor is to supply pins and let frequent racers bring their own belt or snaps if they prefer.

    Why organizers still bundle pins

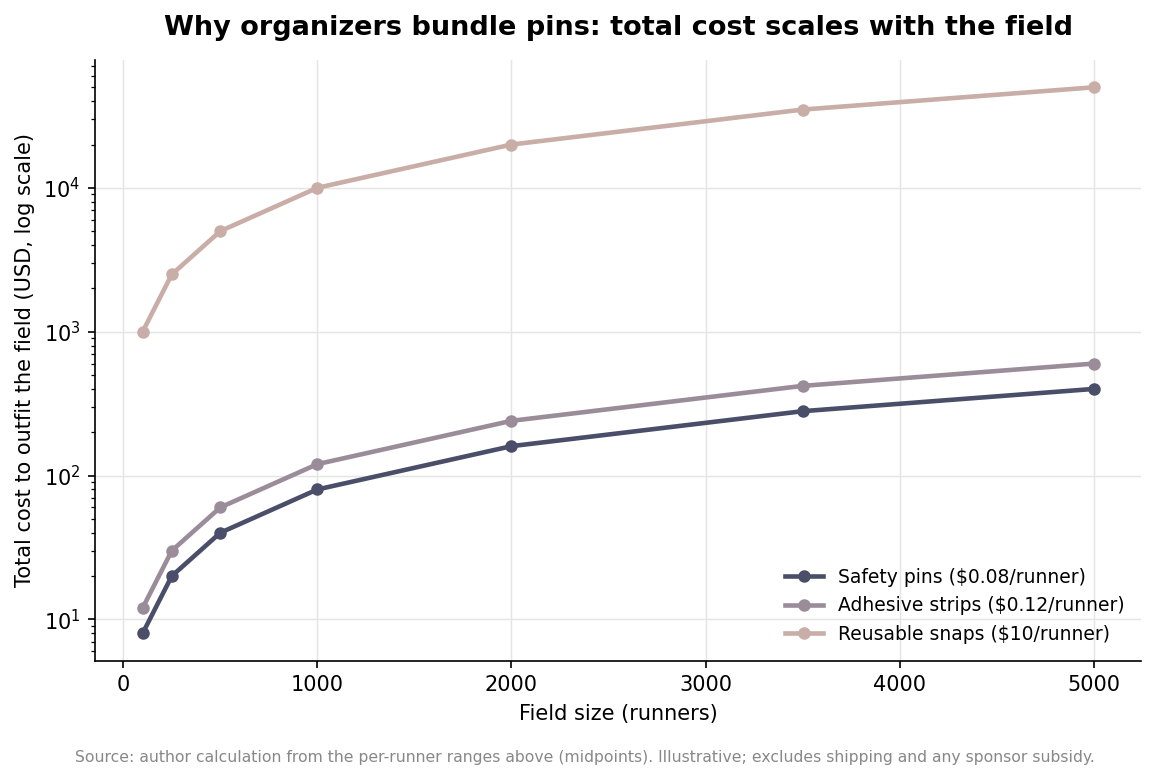
    The per-runner numbers look abstract until you multiply them by a field. A three-cent difference per runner is invisible; a nine-dollar difference is a budget line that scales straight up with registration.

    Line chart of total cost to outfit a race field against field size for safety pins, adhesive strips, and reusable snaps on a log scale
    Total attachment cost scales with the field, which is why organizers bundle pins.

    At a 2,000-runner event, pins run on the order of a couple hundred dollars, adhesive strips a little more, and supplying reusable snaps to everyone would cost as much as a mid-size sponsorship. That is the whole argument in one picture: attachment hardware that makes sense as a personal purchase becomes untenable as a giveaway the moment the field grows. This is also why branded reusable holders show up as sponsor-funded premiums or VIP swag rather than standard inclusions; a sponsor may happily underwrite a few hundred logo’d snap sets for elites and pace teams while every other runner gets pins.

    Getting attachment right for your event

    Match the method to the event rather than defaulting blindly. For a windy point-to-point or a trail race on paper bibs, emphasize four pins and consider upgrading the bib stock to Tyvek so the holes do not propagate. For a chip-timed road race, keep pins but design the bib so the corners are obvious pin zones and the chip area is clearly off-limits, and say so on the packet insert. For a triathlon or multisport event where the number must move from back to front, plan around bib belts and specify a bib with reinforced belt holes or a toggle-friendly layout. And if a sponsor wants a branded attachment moment, route that toward a limited run of snaps or magnets for a subset of participants instead of trying to equip the whole field.

    The through-line is that attachment is not an afterthought to slot in the week before the race; it is a spec that should be decided alongside the bib material and timing system. Get it right and no one notices, which is exactly the goal. Costs for pins, strips, and reusable hardware move with supplier and quantity, so confirm current bulk pricing and lead times in writing when you place the bib order, and fold the attachment count into the same purchase so it arrives together.

  • RFID Timing Bibs, Explained: How the Chip on the Back Actually Works

    RFID Timing Bibs, Explained: How the Chip on the Back Actually Works

    Flip over a modern race bib and you will usually find a thin foam-and-film rectangle glued to the back. That is the timing tag, and it is the reason a 3,000-person race can post accurate finish times within seconds of each runner crossing the line. For a race director choosing bibs, understanding what that tag is and how it gets read changes the questions you ask your printer and your timer. This is a plain-language walk through the technology and the numbers behind it.

    What the tag on the back actually is

    The overwhelming majority of race timing runs on passive UHF RFID operating in the 860 to 960 MHz band, following the ISO/IEC 18000-6C and EPC Gen2v2 standards. Passive means the tag carries no battery. It sits inert until it enters the radio field thrown out by a reader antenna, draws power from that field, and reflects back a modulated signal carrying its unique ID. That is why disposable tags can cost cents rather than dollars: there is nothing inside but an antenna and a tiny chip.

    The physical tag is a printed inlay, typically something like an Impinj M830 or NXP UCODE 9 in a 97 by 27 millimeter label, with the antenna trace occupying most of that footprint. It is adhered to the bib during production, oriented to match the polarization of the timing antennas the race will use. One detail matters more than people expect: the human body absorbs UHF radio energy, so tags are often mounted with a small foam spacer that lifts the inlay a few millimeters off the runner’s shirt. That gap measurably improves read rate. This is also why the tag lives on the bib, worn on the front of the torso facing the antennas, rather than tucked into a pocket.

    How your time gets recorded

    At each timing point the runner passes through a reading field created by antennas. Two antenna styles do the work. Mat antennas lie flat on the ground and read tags from below as runners step over them, while panel antennas stand on both sides of the course at roughly bib height, angled inward. Large races combine the two so a tag gets multiple chances to be read from multiple angles in the fraction of a second a runner is in the zone. The reader logs the tag ID and a timestamp, and software matches that ID to the runner assigned to the bib.

    Read rate is the number that keeps timers awake. A well-designed system is expected to catch essentially everyone: as a reference point, the New York City Marathon has reported a 99.9 percent read rate using roughly 70 controllers across 30 control lines. That reliability does not come from one antenna working harder; it comes from redundancy, both in antenna placement and, often, in the number of tags on each bib.

    One tag or two?

    Timers talk about single versus double bib tagging. In a single-tag setup each bib carries one inlay, which is the most cost-effective choice and is perfectly adequate for most local and mid-sized events. In a double-tag setup, two inlays encoded with the same ID are applied to each bib, separated by at least a few inches so they do not detune each other. Because either tag can trigger the read, the odds of missing a runner drop sharply, which is why championship and large-field races often specify it. The tradeoff is blunt: two tags cost roughly twice as much per bib as one.

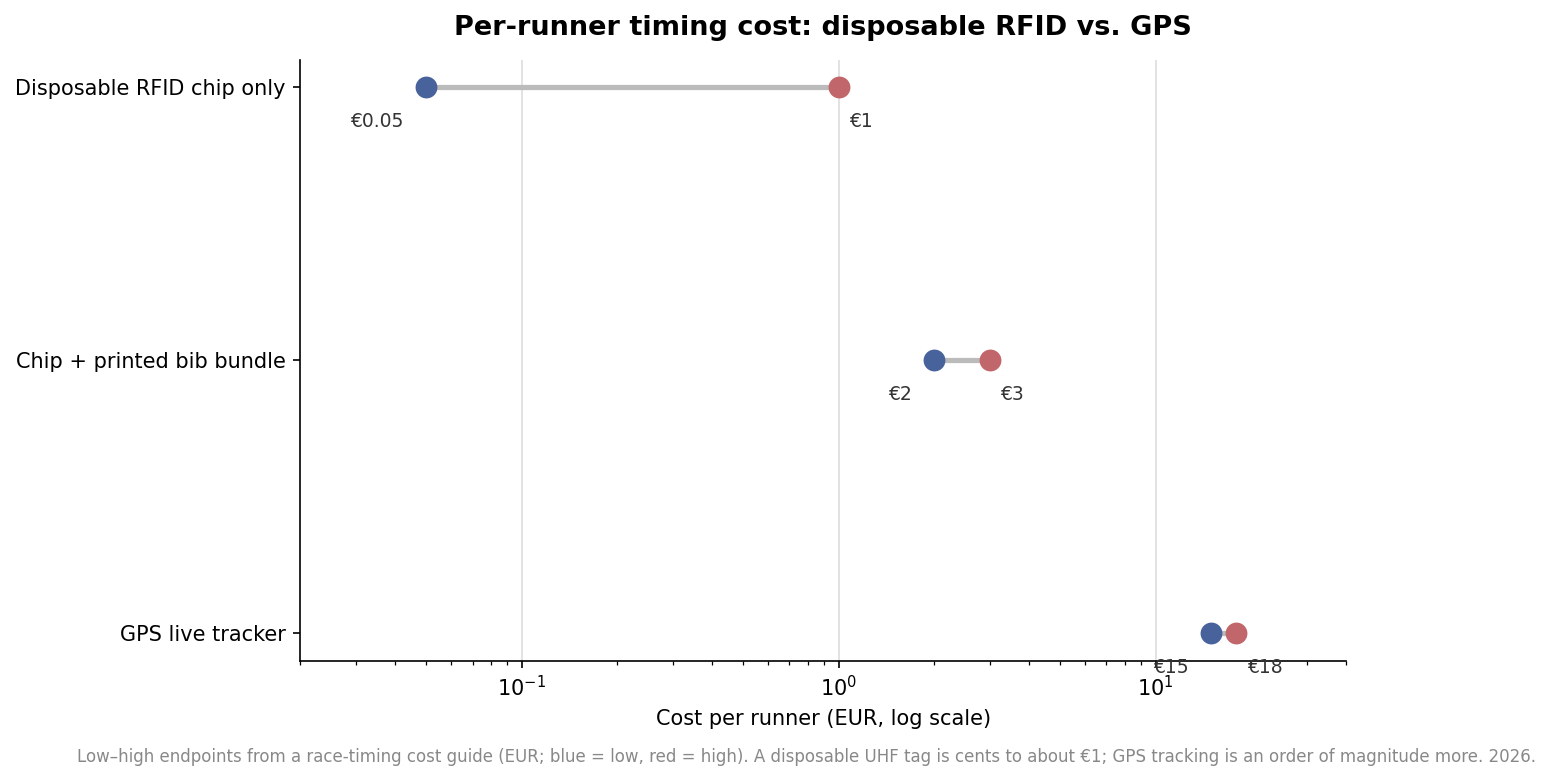
    That decision is really about per-runner economics, and the numbers are small but they scale. A disposable UHF inlay runs from a few cents to about one euro depending on volume and model, so a bundled chip-and-bib package typically lands around two to three per participant. Double-tagging pushes the tag portion up before you have printed a single number. Across a 5,000-runner event, choosing double tags is a four-figure line item, so it is worth deciding deliberately rather than by default.

    Dumbbell chart comparing per-runner timing cost in euros: disposable RFID chip, chip plus bib bundle, and GPS tracker on a log scale
    Per-runner cost by method: disposable RFID timing is an order of magnitude cheaper than GPS.

    Read the chart as orders of magnitude rather than exact quotes. The takeaway for most organizers is that disposable RFID is the cheapest reliable way to time a field, an order of magnitude below live GPS tracking, which is why it dominates road racing. Reserve GPS for events where spectators need a moving map, not for standard finish-line timing.

    What the full timing setup costs

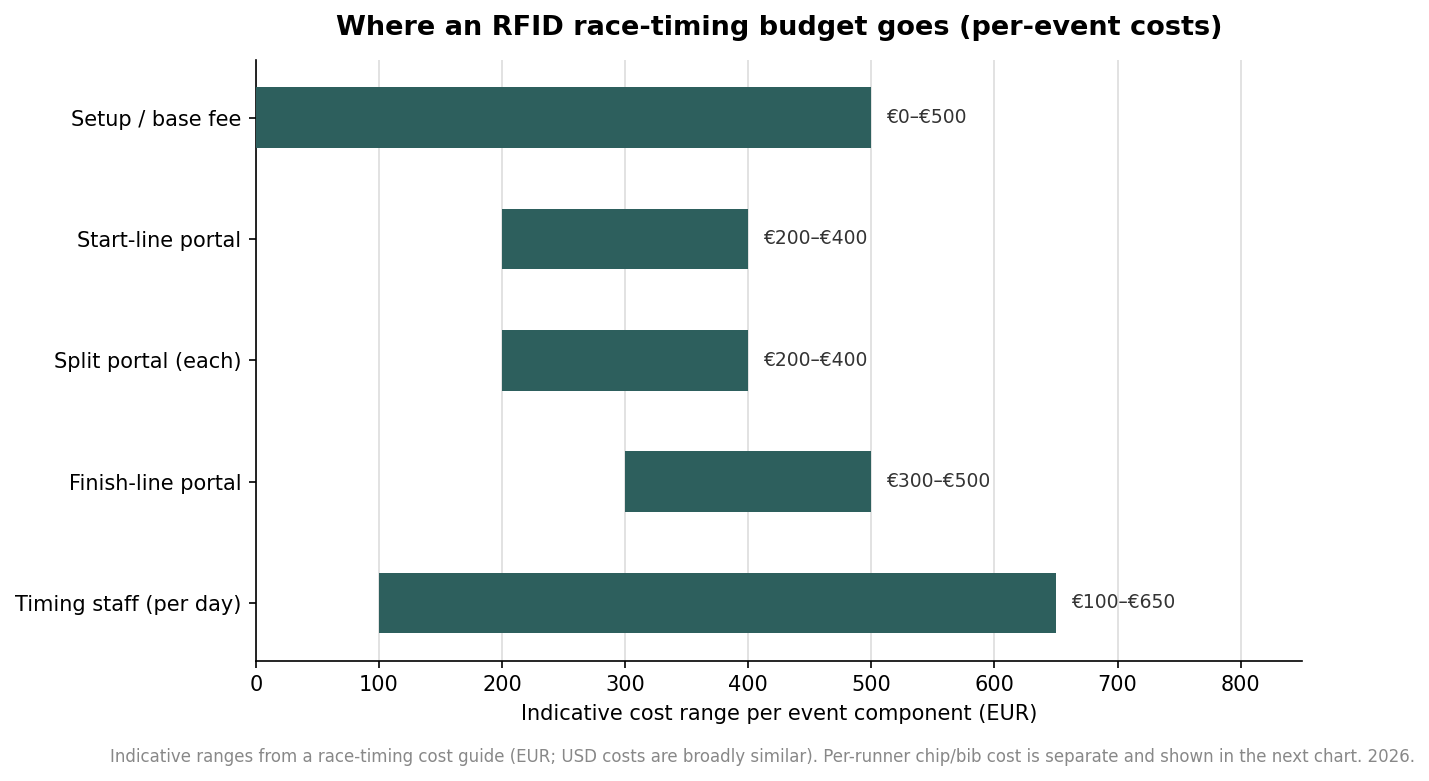
    The tag is the cheap part. The larger costs sit in the timing operation around it: the portals at the start, finish and any split points, the mats and structures, and the staff who run them on race day. A small local race can be timed for a few hundred, while a large event with multiple splits and backup systems runs into the thousands.

    Floating bar chart of per-event RFID race timing cost ranges in euros for setup, start, split and finish portals and daily timing staff
    Indicative per-event cost ranges for an RFID timing setup; the tag itself is the cheap part.

    These are indicative euro ranges from a timing-cost guide, and dollar figures are broadly similar, but the structure is what to internalize. Fixed costs like portals and staff do not shrink with a small field, so per-runner cost is high for tiny races and falls as you spread those fixed costs across more entrants. If you are timing a 200-person fun run, the chips are almost free and the portals are almost everything; at 5,000 runners the balance flips. Knowing which side of that curve you are on tells you whether to negotiate the setup fee or the per-tag price.

    What to hand your timer and your printer

    Two suppliers touch the bib: whoever prints it and whoever times the race, and they need to agree before production. Ask your timer which tag model and orientation they want, whether they need single or double tagging, and whether they supply the inlays or expect the printer to apply them. Many bib printers can adhere disposable inlays during production, which saves the timer a night of hand-applying stickers, but only if the tag placement and spacing are specified up front. Confirm the tag sits in a consistent zone on every bib, clear of fold lines and pin holes, and leave the foam spacer in the plan if your timer recommends one. Get those details onto the order and the technology mostly disappears into the background, which is exactly where a race director wants it on event morning.

  • Race Bib Template: How to Lay Out a Bib That Reads at the Finish Line

    Race Bib Template: How to Lay Out a Bib That Reads at the Finish Line

    A race bib looks like the simplest print job at an event, a number on a rectangle, until you try to lay one out and discover how many jobs that rectangle has to do at once. It has to be readable from thirty feet by a finish-line camera, survive rain and safety pins for a few hours, carry sponsor logos that paid for the race, hold a timing tag on the back, and give medical staff a runner’s emergency contact if something goes wrong. A good template is what keeps those demands from colliding. Here is how the pieces fit, from the number outward.

    Start with the size, then the number

    Bib dimensions vary by event, but most land in a familiar band. A common all-purpose size sits around 6 by 9 inches, small events and kids’ races drop closer to 5 by 7, and slim competitor-number strips run as narrow as 8 by 3.5 inches. Pick the size first because everything else is a proportion of it. The race number is the single most important element and should dominate the layout; on that 8 by 3.5 inch strip the numerals stand about 2.5 inches tall, and larger marathon bibs push the digits taller still so a camera can read them across a crowded chute. As a working rule, make the number as large as the bib allows after margins, set it in a heavy, condensed typeface, and keep it in solid black on a light field for the highest contrast. Everything that is not the number is secondary and should look it.

    Stacked vertical bar chart showing how a race bib's height divides into number, sponsor, name, and tear-off stub zones
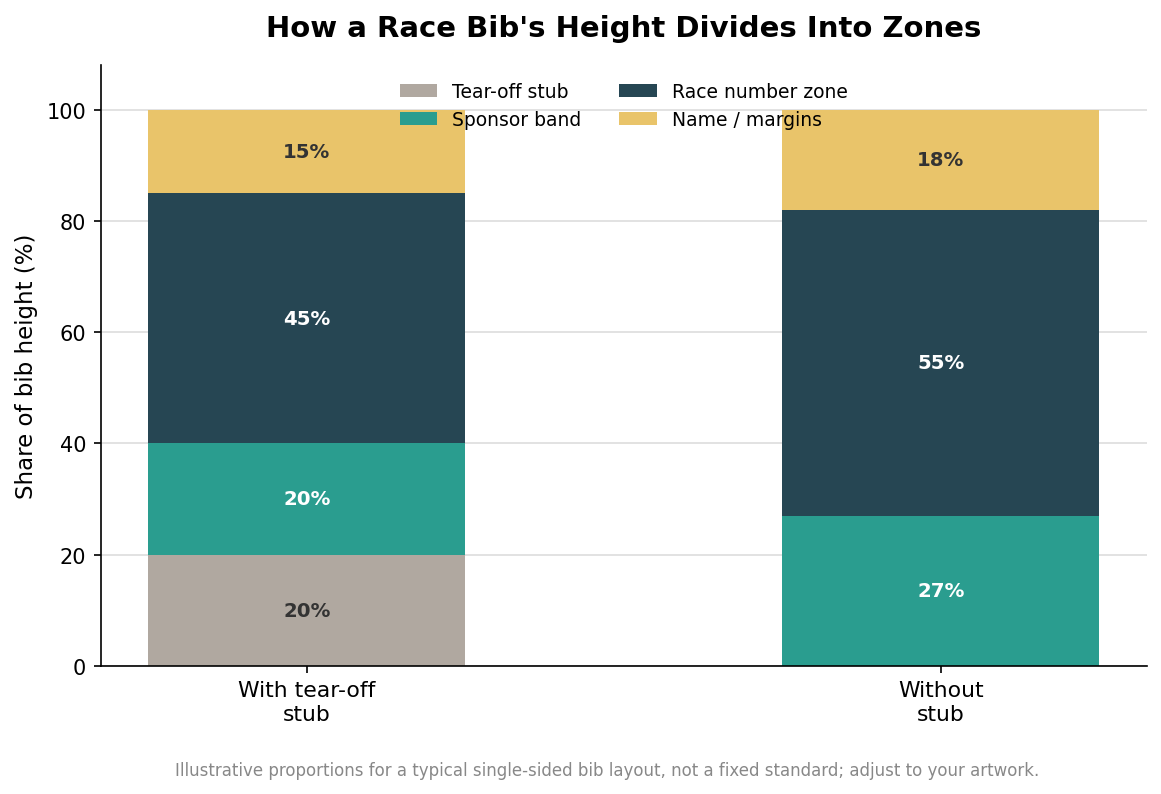
    An illustrative split of a bib’s height into its functional zones, with and without a tear-off stub.

    The zones on the front

    Think of the front as stacked bands rather than a blank canvas. The number zone takes the center and the majority of the height. A thin name or message line can sit above it for personalized bibs, which lift finish-line energy when a spectator can shout a runner’s name. The sponsor band belongs at the bottom, where logos stay visible without competing with the number, and it is worth reserving that strip early because sponsor artwork always arrives late and in the wrong proportions. If the race uses barcodes or QR codes for check-in or results, they need a quiet corner with clear space around them so a scanner is not fighting a logo. Larger races add one more layer to this band structure: a color block or a printed letter that marks a runner’s start wave or corral, which lets volunteers sort a field of thousands at a glance. Keep that marker bold and near the top or a corner where a marshal can see it without asking the runner to turn around. Resist the urge to fill every gap; white space is what makes the number pop.

    The stub and the corners

    Two functional details decide whether a bib works on the ground. The first is the tear-off stub, a perforated strip usually at the bottom that staff pull for bag check, results reconciliation, or a post-race meal, and it needs its own space with the runner’s number repeated on it so a detached stub is still identifiable. The second is the corners. Bibs are pinned through all four, so keep the number and any vital text inside a safe margin away from the corners and edges, because a pin through a digit or a logo looks careless and can tear. Leaving a clear border of roughly a third to half an inch around the live area also gives the material something to give when it flexes, which matters more on paper than on Tyvek.

    Bar chart with error bars showing per-bib cost ranges for paper, Tyvek, and single- and double-sided custom-printed race bibs
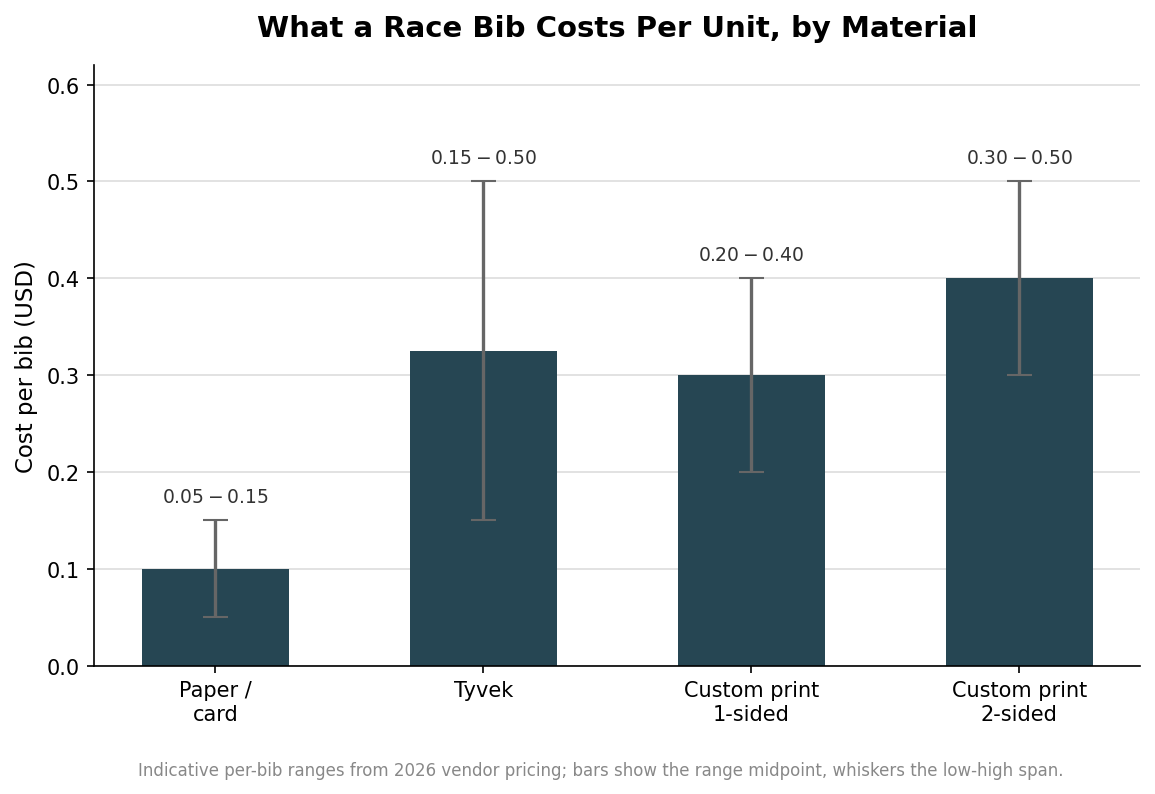
    Per-bib cost by material; bars mark the range midpoint and whiskers the low-to-high span.

    The back is not blank space

    The reverse of the bib does real work. Most events print an emergency contact and basic medical field on the back for runners to fill in, a small safety feature that medical teams genuinely use. The back is also where the timing tag lives on chip-timed races. Disposable UHF RFID tags are fixed to the back of the bib, mounted on a thin protective foam layer that holds the antenna off the runner’s body and keeps it dry, and they can be applied horizontally or vertically depending on the tag and the timing system. If your race is chip-timed, ask the timer for their tag footprint and keep that area of the back free of heavy ink and folds, because a crease across the antenna is a lost read at the mat. Design the back at the same time as the front, not as an afterthought once the artwork is approved.

    Material, cost, and a clean export

    Material sets both durability and budget, and the spread is wide for such a small item. Plain paper or card bibs run roughly 5 to 15 cents each and suit dry, short, low-stakes events. Tyvek, the tear- and water-resistant synthetic that most serious races use, lands around 15 to 50 cents per bib depending on size and print. Full-color custom printing tends to sit near 20 to 40 cents for a single-sided bib, with roughly another dime per bib to print the back as well, which is money well spent once you are putting emergency fields and a timing tag back there. When you export the template, build it at the final size with a small bleed, keep the number and critical text inside a safe margin, and supply sponsor logos as vector art so they stay crisp at any scale. Lock the size, the number, and the back layout early, and the race bib stops being a last-minute scramble and becomes the reliable, readable rectangle the whole event depends on.

  • A Race Director’s Guide to Race Bib Costs and Margins — Customized Race Bibs

    Call or Text us: (929) 605-4397

    Home › Blog › A Race Director's Guide to Race Bib Costs and Margins

    Race directors

    A Race Director's Guide to Race Bib Costs and Margins

    06/30/2026

    Bibs are a small line item on a race budget compared to permits, timing services, and course support — but they are also one of the easiest costs to get wrong, because per-unit price swings meaningfully with quantity, material, and how much personalization you build in.

    Here is how to think about bib costs as part of your overall race economics.

    Where bib cost fits in your entry fee

    For most road races, bib cost per runner lands well under a dollar — a small fraction of a typical entry fee that also covers timing, permits, medals, and support. Because the cost is so small relative to entry fees, most race directors treat bib quality as a brand decision rather than a cost-cutting target: a bib that looks professional and holds up all day reflects well on your race, and the marginal cost difference between a basic and upgraded bib rarely moves your entry fee at all.

    Quantity and price tiers

    Per-unit price drops as quantity increases, which matters most for races that grow year over year. Ordering slightly above your current registration count — to cover late registrations, bib replacements, and volunteer or staff bibs — often costs less per unit than ordering a tight exact count and running short.

    Material cost tradeoffs

    DecisionCost impactWhen it pays off
    Standard paper vs. TyvekSmall premium for TyvekAny event with rain or water-crossing risk
    Timing-chip slotIncluded, no added costAny certified or age-group-award race
    Personalization (names, numbers)Included at standard volumeAny event with runner-facing branding goals
    Larger quantity orderLower per-unit costGrowing multi-year races

    Budgeting for growth

    If your race is trending upward year over year, lock in your numbering and design template early so reorders move faster and you can order confidently at the next quantity tier without re-designing from scratch. Keeping your artwork and specs on file with your bib supplier removes a repeat design cost from your budget entirely.

    Sponsor-funded bibs

    Many charity and community races offset bib cost entirely through a sponsor placement on the bib itself — a logo or a “presented by” line is a low-friction sponsorship tier that many local businesses will fund in exchange for guaranteed visibility in every finisher photo.

    Key takeawayBib cost is a small fraction of most race budgets, so treat material and personalization choices as brand decisions, and order slightly above your registration count to avoid a costly reorder.

    Ready to budget your next race’s bibs? Get a custom quote — free mockups in 24 hours. Learn more about how we work, or browse more guides.

    More posts

  • How to Order Custom Race Bibs: A Step-by-Step Checklist — Customized Race Bibs

    Call or Text us: (929) 605-4397

    Home › Blog › How to Order Custom Race Bibs: A Step-by-Step Checklist

    Ordering

    How to Order Custom Race Bibs: A Step-by-Step Checklist

    05/27/2026

    Ordering race bibs for the first time — or the fiftieth time, on a tight registration timeline — goes smoother with a checklist. Most delays we see come from missing artwork, an undecided numbering scheme, or a quantity estimate that changes after the mockup is already approved.

    Here is the process broken into steps, in the order we recommend tackling them.

    Step 1: Lock your headcount estimate

    You do not need a final number to request a quote — an approximate is fine, and we will firm it up before production. But have a realistic range in mind based on current registrations or last year’s turnout, since quantity is the biggest driver of your per-unit price.

    Step 2: Gather your artwork

    Send your race logo as a vector file (AI, EPS, SVG, or PDF) if you have one. If you only have a PNG, JPEG, or printed reference, our designers will recreate it print-ready at no charge — just flag that up front so we can plan for it.

    Step 3: Decide your numbering and personalization scheme

    Will bibs be sequentially numbered to match your registration system? Do you need age-group color coding, wave assignments, or runner names? Answering this before the mockup stage avoids a second round of revisions later.

    Step 4: Choose your stock

    Standard coated paper works for most road races and indoor events. Choose Tyvek waterproof if there is a real chance of rain, mud, or a water crossing on your course.

    Step 5: Approve your mockup

    We return a photo-real mockup within 24 hours of your quote request. Review it against your actual data file if you are personalizing, and request revisions freely — there is no charge for additional rounds.

    Step 6: Confirm and pay

    Once you approve the design, confirm final quantity and pay. Production starts the same day.

    Step 7: Receive and distribute

    Bulk orders ship in about two weeks. If bibs are pre-sorted by wave, age group, or pickup location, confirm that sorting scheme with us before production so cases arrive ready to distribute.

    StepWhat you needTypical timing
    1. Headcount estimateApproximate quantityBefore quote
    2. ArtworkLogo file (vector preferred)With quote request
    3. Numbering schemeData file or planBefore mockup
    4. Stock decisionPaper or TyvekWith quote request
    5–7. Approve, pay, shipSign-offWithin one business day + 2 weeks
    Key takeawayThe fastest path to bibs on race day is locking your numbering scheme and gathering artwork before you request your mockup — everything else moves quickly once those are settled.

    Ready to start your order? Get a custom quote — free mockups in 24 hours. Learn more about how we work, or browse more guides.

    More posts

  • Tear-Resistant Tyvek vs. Standard Paper Bibs: Which Holds Up — Customized Race Bibs

    Call or Text us: (929) 605-4397

    Home › Blog › Tear-Resistant Tyvek vs. Standard Paper Bibs: Which Holds Up

    Buyer guides

    Tear-Resistant Tyvek vs. Standard Paper Bibs: Which Holds Up

    05/08/2026

    We covered the basic material tradeoff between paper and Tyvek in an earlier post. This one goes deeper on the specific failure points race directors actually run into on race day — pin-hole tearing, ink smearing, and edge fraying — and how each material performs against them.

    If you have ever seen a runner cross the finish line with an illegible, half-torn bib, this is why it happened, and how to prevent it on your race.

    Pin-hole tearing

    The four corners where a bib is safety-pinned to a shirt take the most repeated stress of any point on the bib — wind flapping, arm swing, and a runner adjusting their bib mid-race all pull directly on those holes. Standard coated paper has natural fiber grain that tears relatively easily once a hole starts to run. Tyvek’s spun-bond fiber structure resists tear propagation, so a small pin-hole stays a small pin-hole instead of splitting into a rip.

    Ink and number legibility when wet

    This is where the two materials diverge most. Coated paper’s ink sits on a surface that softens and pulls apart once soaked, and numbers can smear or the whole bib can go translucent and floppy. Tyvek is inherently water-resistant, and we print it with ink formulated to cure into the synthetic surface, so a soaked Tyvek bib still reads clearly at the finish line.

    Edge fraying over a long race

    Over a multi-hour marathon, constant friction against a runner’s shirt or a fuel belt frays the edges of a paper bib, sometimes enough to compromise the tear-tab or a corner pin hole by mile 20. Tyvek’s synthetic weave resists this kind of progressive wear far better than paper fiber.

    Failure pointPaper performanceTyvek performance
    Pin-hole tearingModerate riskLow risk
    Wet-condition legibilityDegrades quicklyStays legible
    Long-race edge wearFrays over hoursResists fraying

    When paper still wins

    None of this means Tyvek is always the right call. For a dry, indoor, or short-duration event, paper’s lower cost and perfectly adequate durability make it the more sensible choice. Durability upgrades are worth paying for when the conditions justify them, not as a default.

    Key takeawayTyvek outperforms paper at every common race-day failure point — pin-hole tearing, wet legibility, and edge fraying — but paper remains the better value for short, dry, standard events.

    Deciding between materials for your race? Get a custom quote — free mockups in 24 hours. Learn more about how we work, or browse more guides.

    More posts

  • Race Bibs for School Sports vs. Marathons vs. Charity Runs — Customized Race Bibs

    Call or Text us: (929) 605-4397

    Home › Blog › Race Bibs for School Sports vs. Marathons vs. Charity Runs

    Audience guides

    Race Bibs for School Sports vs. Marathons vs. Charity Runs

    04/19/2026

    A race bib designed for a certified marathon and a bib designed for a school field day are solving two different problems, even though they look similar at a glance. Sizing, numbering complexity, stock, and even print boldness all shift depending on who is wearing the bib and who is reading it.

    Here is how to match your bib spec to your actual audience.

    School & youth sports events

    Youth bibs need to be smaller, lighter, and bolder. A full-size adult bib on a nine-year-old folds over and obscures the number. Print runs larger relative to bib size because the person reading it is often a volunteer with a clipboard standing at a distance, not a professional timer with a scanner. Grade or age-group color coding is standard, since youth events are almost always organized by division.

    Marathons & certified road races

    Certified races need accurate, disputable-free timing, which usually means a timing-chip compatible bib with a precisely placed chip slot and bib numbers that match your registration export exactly. Stock is standard coated paper unless the forecast calls for rain, in which case Tyvek is worth the upgrade. Corrals and pace groups need clear visual separation, often through color-blocked bib backgrounds.

    Charity & fundraising runs

    Charity runs prioritize sponsor visibility and finish-line photos over competitive timing precision. Bibs often carry a sponsor wall or fundraising team name alongside the runner’s number, and many charity events skip formal chip timing altogether in favor of a simple tear-tab for raffle or gear check.

    Comparison at a glance

    Event typeTypical bib sizeNumbering priorityCommon stock
    School & youth sportsSmaller, bold printAge/grade groupingLightweight paper
    Marathons & road racesStandardTiming accuracyPaper or Tyvek
    Charity runsStandardSponsor visibilityPaper, full-color

    Choosing for your event

    If you are not sure which spec fits, start with your audience and your finish-line goals: accurate results push you toward a timing-chip bib, sponsor visibility pushes you toward full-color print real estate, and younger runners push you toward a smaller, bolder format. Most events land on a mix — a marathon might run timing-chip bibs for the open field and VIP pace bibs for its pacers.

    Key takeawayMatch bib size and numbering complexity to your actual audience — youth events need smaller, bolder bibs; certified races need precise timing compatibility; charity runs need sponsor real estate.

    Not sure which bib fits your event? Get a custom quote — free mockups in 24 hours. Learn more about how we work, or browse more guides.

    More posts

  • Paper vs. Tyvek Race Bibs: Which Material Should You Choose — Customized Race Bibs

    Call or Text us: (929) 605-4397

    Home › Blog › Paper vs. Tyvek Race Bibs: Which Material Should You Choose

    Buyer guides

    Paper vs. Tyvek Race Bibs: Which Material Should You Choose

    04/01/2026

    Most race directors default to a standard coated-paper bib without a second thought, and for a huge share of events, that is the right call. But a growing number of races — trail runs, triathlons, anything with a real chance of rain — are better served by Tyvek, a waterproof synthetic material that behaves completely differently once conditions turn.

    Here is the honest comparison, not the sales pitch.

    Coated paper: the everyday standard

    Coated paper stock is lighter, less expensive, and perfectly adequate for the vast majority of road races, community 5Ks, and indoor or fair-weather events. It prints crisp, pins cleanly, and holds up fine through a normal race day of sweat and handling.

    Tyvek: built for wet and rugged conditions

    Tyvek is a spun-bond synthetic material that does not absorb water and resists tearing at the pin holes. Where coated paper turns to pulp after twenty minutes in steady rain, Tyvek stays legible and intact through a full soaking, a mud crossing, or a swim leg.

    Side-by-side comparison

    FactorCoated PaperTyvek
    Water resistanceLow — degrades when wetHigh — fully waterproof
    Tear resistanceModerateHigh
    Relative costLowerSlightly higher
    Best forRoad races, indoor events, fair weatherTriathlons, trail races, rain-forecast events

    How to decide

    Ask one question: is there a real chance your bib gets wet before the race ends? If your event is indoors, on pavement, and the forecast is dry, coated paper is the more economical choice and performs just as well. If your event includes a swim leg, a water crossing, mud, or a meaningful chance of rain, Tyvek is worth the small per-unit premium — a bib that survives is cheaper than a mid-race reprint or a runner with an illegible number at the finish.

    Key takeawayChoose coated paper for cost efficiency on dry, standard events, and Tyvek whenever water, mud, or rain is a real possibility on race day.

    Not sure which material fits your race? Get a custom quote — free mockups in 24 hours. Learn more about how we work, or browse more guides.

    More posts

  • Personalizing Race Bibs with Runner Names and Numbers — Customized Race Bibs

    Call or Text us: (929) 605-4397

    Home › Blog › Personalizing Race Bibs with Runner Names and Numbers

    Personalization

    Personalizing Race Bibs with Runner Names and Numbers

    03/15/2026

    Every runner glances down at their bib at least once during a race, and every finish-line photographer frames a shot around it. A bib that only carries a plain number is a missed opportunity — adding the runner’s first name, or the correct age-group color, turns a piece of paper into part of the race experience.

    Here is how to plan personalization without slowing down your production timeline.

    What you can personalize

    Beyond a sequential bib number, we commonly print a runner’s first name, an age-group or wave designation, a fundraising team name, or a sponsor tier. Each of these prints from a single data file — a spreadsheet with one row per runner — so personalization does not require a separate proof for every bib.

    How the process works

    You send us a spreadsheet with bib number, name (if personalizing), and any group or wave assignment. We merge that data into your approved bib design and run every bib as an individually printed piece, in the same production cycle as a standard bulk order. There is no added lead time for personalization itself — the two-week window covers it.

    Common personalization requests

    Personalization typeTypical useData needed
    Runner first nameMarathons, charity runsName + bib number list
    Age-group color codingSchool sports, youth leaguesGrade/age + bib number list
    Wave/corral assignmentLarge marathonsCorral + bib number list
    Team or fundraising groupCharity runsTeam name + bib number list

    Planning your data file

    The most common delay in a personalized order is a data file that arrives with duplicate bib numbers, missing names, or inconsistent formatting. Send your list as early as possible, even in draft form, so our production team can flag issues while there is still time to fix them before the mockup stage.

    Getting it right the first time

    Because personalization ties directly to your registration data, we always recommend finalizing bib numbers before ordering, or at minimum before your registration deadline closes. A late name change or a swapped bib number is easy to accommodate before production starts, and difficult once bibs are printed.

    Key takeawayPersonalized bibs run on the same two-week production timeline as standard bibs — the only requirement is a clean data file with bib numbers and names or group assignments.

    Ready to personalize your next race bib order? Get a custom quote — free mockups in 24 hours. Learn more about how we work, or browse more guides.

    More posts